Your home is one of your most valuable assets. Keeping it in good shape takes consistent effort. Electrical systems, in particular, need regular attention. A small problem today can become a costly repair tomorrow.
The good news is that most basic home electrical maintenance is manageable. With the right tools and a little knowledge, you can handle many tasks yourself. However, knowing when to call a professional is just as important as knowing what to do on your own.
This article will guide you through the essentials — from the tools you need to the habits that keep your home safe and running smoothly.
Why Electrical Maintenance Matters
Most homeowners focus on what they can see. They paint walls, fix leaky taps, and mow the lawn. Electrical systems, however, are mostly hidden. That makes them easy to ignore until something goes wrong.
Faulty wiring causes thousands of house fires every year. Loose connections lead to power outages. Worn-out outlets can damage your appliances. Therefore, staying on top of your electrical system is not just about convenience — it is about safety.
Regular maintenance also saves money. Catching a problem early almost always costs less than fixing the same problem after it has worsened. A small investment in time and tools today can protect you from major expenses down the road.
Getting Started: What Every Homeowner Should Know
Before you pick up any tool, understand the basics of your home’s electrical system. Know where your main circuit breaker panel is located. Learn how to switch off individual circuits. This knowledge is essential before doing any inspection or repair work.
Always turn off power to the area you are working in before touching any wiring or outlets. Use a non-contact voltage tester to confirm the power is off. This simple habit can prevent serious injury.
Additionally, never work on electrical components when your hands are wet. Avoid standing on damp surfaces. These precautions take seconds but can save your life.
Building Your Electrical Tool Kit
Having the right tools on hand makes every job easier and safer. You do not need a professional-grade setup. However, a basic collection of quality tools will serve you well for years.
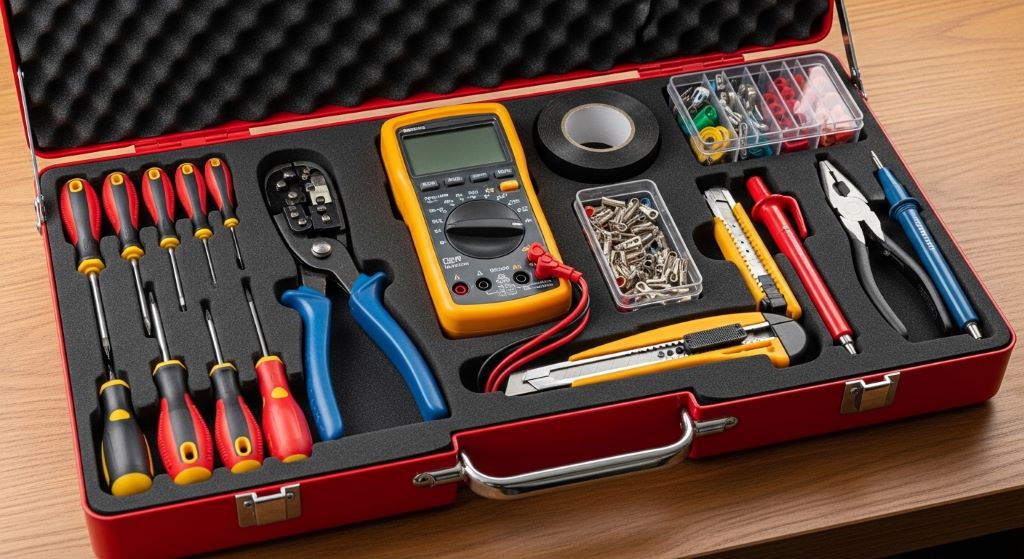
Here is what a solid home electrical tool kit should include:
- Non-contact voltage tester
- Digital multimeter
- Screwdrivers (flathead and Phillips, insulated handles)
- Needle-nose pliers
- Wire strippers
- Electrical tape
- Circuit breaker finder
- Flashlight or headlamp
- Cable fish tape
- Wire nuts and connectors
These are your core repair tools. Each one serves a specific purpose, and together they cover the most common home electrical tasks. Buy quality over quantity. A cheap screwdriver with a worn handle is a safety risk. Insulated tools rated for electrical work are worth the extra cost.
Store your tools in a dedicated toolbox or bag. Keep it in a dry location. Moisture damages tools and reduces their reliability. Additionally, check your tools regularly for signs of wear, cracking, or damage.
Creating a Home Electrical Maintenance Checklist
A routine is the best way to stay ahead of problems. Many homeowners follow a maintenance checklist tools system that divides tasks by season or frequency. This approach ensures nothing gets overlooked and every part of the home receives regular attention.
Here is a practical framework to follow:
Monthly Checks
Test your smoke detectors. Press the test button and listen for the alert. Replace batteries if the sound is weak or absent. Smoke detectors save lives, and a dead battery makes them useless.
Check your GFCI outlets. These are the outlets with the “Test” and “Reset” buttons, usually found in bathrooms, kitchens, and garages. Press “Test” to trip the outlet, then press “Reset” to restore it. If it does not respond correctly, it needs to be replaced.
Walk through your home and look for any outlets or light switches that feel warm to the touch. A warm outlet is a warning sign. It may indicate a loose connection or an overloaded circuit. Do not ignore it.
Quarterly Checks
Inspect your circuit breaker panel every three months. Look for any breakers that have tripped. A breaker that trips repeatedly signals a problem with that circuit. Do not simply reset it — investigate the cause.
Check all visible wiring in accessible areas like the basement, attic, or garage. Look for fraying, discoloration, or signs of rodent damage. Even small damage to insulation can become a fire hazard over time.
Test all outdoor outlets and lighting. Exposure to weather causes faster wear. Make sure covers are intact and that outlets feel secure in their housings.
Annual Checks
Once a year, do a thorough inspection of your entire electrical system. This is a good time to use your digital multimeter to test outlet voltage. Most outlets should read between 110 and 120 volts. Readings significantly outside this range may point to a wiring issue.
Check the grounding of your outlets. A three-pronged outlet should always be grounded. Ungrounded outlets are a safety risk, especially for sensitive electronics. If you find two-pronged outlets in your home, consider having them upgraded.
Inspect your light fixtures. Look for bulbs that flicker or buzz. These symptoms often point to loose wiring inside the fixture. Additionally, check that all bulbs are the correct wattage for the fixture. Using a higher wattage than recommended generates excess heat, which damages wiring over time.
Using a Multimeter: A Core Skill for Homeowners
The digital multimeter is one of the most useful repair tools in any homeowner’s kit. It measures voltage, current, and resistance. Learning to use one properly takes very little time and opens up a wide range of diagnostic possibilities.
To test an outlet, set the multimeter to measure AC voltage. Insert the probes into the outlet slots. The reading should fall between 110 and 120 volts. If the reading is zero, the outlet may not be receiving power. If it is significantly lower than expected, the circuit may be overloaded or experiencing a fault.
You can also use a multimeter to test a suspected faulty switch or to check whether a fuse has blown. These are straightforward tests that take seconds. However, always ensure the power is off before probing any wiring directly.
Replacing an Outlet: A Step-by-Step Overview
Replacing a worn or damaged outlet is one of the most common home electrical repairs. It is manageable for most homeowners who take the proper precautions.
Start by turning off the circuit that powers the outlet. Use your non-contact voltage tester to confirm there is no live current. Remove the outlet cover plate, then unscrew the outlet from the electrical box.
Carefully pull the outlet away from the box. Note how the wires are connected before removing them. Take a photo if it helps. There will typically be a black wire (hot), a white wire (neutral), and a green or bare copper wire (ground).
Connect the wires to the new outlet in the same configuration. Wrap connections with electrical tape for added security. Gently push the outlet back into the box, screw it in place, and replace the cover plate. Restore power and test with your voltage tester.
This process uses several of your core repair tools and reinforces good habits around safety and precision.
When to Call a Professional Electrician
Some tasks are beyond the scope of DIY maintenance. Knowing where to draw the line is important. Attempting complex electrical work without proper training can cause injury or create hidden hazards that are difficult to detect later.
Call a licensed electrician if you notice any of the following:
- Persistent burning smell from outlets or the breaker panel
- Repeated breaker trips on the same circuit
- Flickering lights throughout the whole house (not just one fixture)
- Sparks from any outlet or switch
- Evidence of water damage near electrical components
- Any work that requires touching the main service panel
These situations go beyond what maintenance checklist tools and basic repair kits can address. A licensed professional has the training, insurance, and equipment to handle them safely.
Organizing Your Tools for Long-Term Success
A well-organized tool kit saves time and reduces frustration. When you need a tool, you should be able to find it immediately. Therefore, invest in a proper storage solution.
A portable tool bag with individual compartments works well for most homeowners. Label compartments or use color-coded pouches for different categories — testing tools, hand tools, and consumables like tape and wire nuts.
Keep a simple log of your maintenance activity. Note the date of each check and anything you observed. This record helps you spot patterns over time. For example, if a breaker trips every few months, your log will show the frequency and help you decide when to escalate.
Additionally, replace worn tools promptly. A cracked screwdriver handle or a multimeter with a faulty display undermines your ability to do the job safely and accurately.
Energy Efficiency and Electrical Maintenance
Maintaining your electrical system is not just about safety. It also affects your energy bills. Loose connections and aging outlets draw more power than they should. Faulty wiring increases resistance, which generates heat and wastes electricity.
Replacing old two-pronged outlets with modern grounded ones, upgrading to LED lighting throughout the home, and installing smart switches or timers are all small changes that reduce energy use over time.
Additionally, consider having an energy audit done every few years. A professional can identify inefficiencies in your electrical system and suggest targeted upgrades. The savings over time often exceed the cost of the audit.
Conclusion
Maintaining your home’s electrical system does not require expert knowledge. It requires consistency, the right tools, and a respect for safety. By building a solid tool kit, following a seasonal maintenance schedule, and knowing when to call for help, you can protect your home and extend the life of your electrical system.
Start with a maintenance checklist tools approach and work through your home systematically. Use quality repair tools for every job, no matter how small. Pay attention to warning signs like warm outlets, flickering lights, and tripping breakers. These signals rarely fix themselves — they need action.
A well-maintained electrical system keeps your home safe, efficient, and comfortable. The effort you put in today will pay off in fewer surprises and lower costs for years to come.
Frequently Asked Questions
How often should I inspect my home’s electrical system?
A basic check should happen monthly for high-priority items like smoke detectors and GFCI outlets. A more thorough inspection should take place every quarter and annually. If your home is older than 25 years, consider a full professional inspection every five years.
What are the most important electrical repair tools for homeowners?
The most essential tools include a non-contact voltage tester, a digital multimeter, insulated screwdrivers, needle-nose pliers, and wire strippers. These cover the majority of routine checks and minor repairs.
Is it safe to replace an electrical outlet myself?
Yes, in most cases. As long as you turn off the circuit, verify the power is off with a voltage tester, and follow the correct wiring configuration, replacing a standard outlet is a manageable DIY task. However, if you are unsure at any point, call a licensed electrician.
What does a warm outlet mean?
A warm outlet usually signals a loose connection, an overloaded circuit, or a failing outlet. It is a warning sign that should not be ignored. Turn off the circuit and inspect the outlet, or call an electrician if you are not comfortable doing so yourself.
How do I know if my home’s wiring is outdated?
Signs of outdated wiring include two-pronged outlets, aluminum wiring, a fuse box instead of a circuit breaker panel, or frequent tripping of breakers. Homes built before 1980 are more likely to have older wiring systems and benefit most from a professional evaluation.
Related Topics:
What does a first aid course teach you
How you can support employees with anxiety