Working with cables and ropes in construction, rigging, or home projects requires proper fastening techniques to ensure safety and reliability. Rope clamps serve as critical components that secure cable loops and connections, preventing slippage that could lead to accidents or equipment failure. Understanding the correct installation process can mean the difference between a secure connection and a potentially dangerous situation.
Many people underestimate the importance of proper clamp installation. They assume tightening a few bolts is sufficient. However, incorrect installation can compromise the entire system’s integrity, regardless of how strong the cable itself might be. This comprehensive guide will walk you through every aspect of installing rope clamps correctly, ensuring your connections remain secure under stress.
Whether you’re setting up a zipline, securing a load, creating guy wires, or working on any project involving cable systems, mastering wire rope clamp installation is essential. This article covers everything from selecting the right clamps to final inspection procedures, giving you the knowledge needed to work safely and confidently.
Understanding Rope Clamp Basics
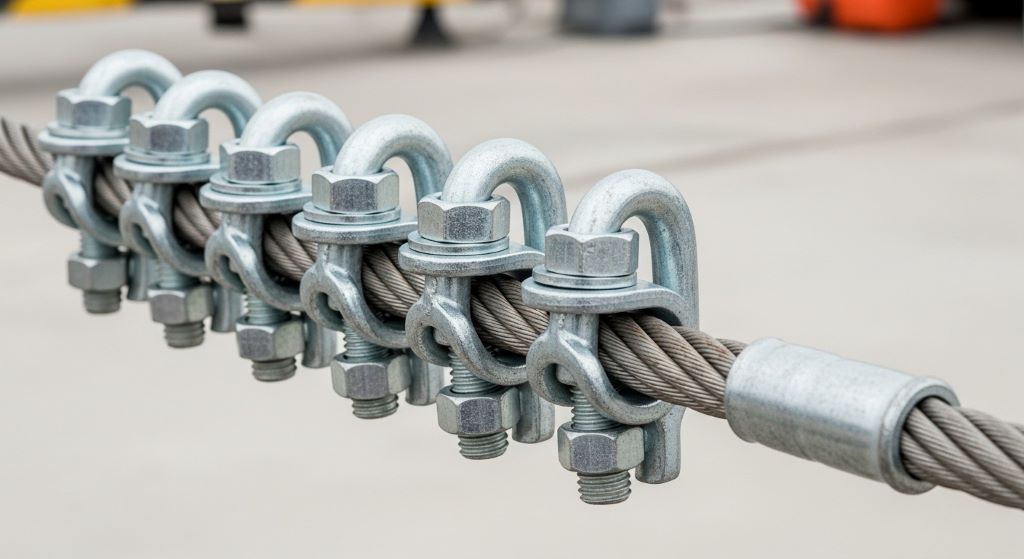
Rope clamps, also called cable clamps or wire rope clips, consist of a U-bolt, a saddle, and two nuts. These simple components work together to create a mechanical grip on wire rope or cable. The U-bolt wraps around the cable while the saddle presses against it from the opposite side, creating friction that holds the cable in place.
Different types of clamps serve various purposes. The most common is the standard U-bolt clamp, which works well for general applications. Drop-forged clamps offer superior strength for heavy-duty applications. Fist-grip clamps provide an alternative design that some professionals prefer for specific situations.
The clamp’s size must match your cable diameter exactly. Using clamps that are too large allows the cable to slip through. Using clamps that are too small prevents proper seating and adequate grip. Always verify compatibility before beginning installation.
Material composition affects both strength and corrosion resistance. Galvanized steel clamps resist rust and work well outdoors. Stainless steel offers even better corrosion resistance for marine environments or areas with harsh weather. Malleable iron clamps are suitable for lighter indoor applications.
Selecting the Right Clamps for Your Project
Choosing appropriate clamps involves more than matching the cable diameter. You must consider the application’s specific demands, including load requirements, environmental conditions, and safety factors.
Start by determining your cable’s breaking strength. Your clamps must maintain a significant percentage of that strength when properly installed. Quality clamps typically retain 80 to 90 percent of the cable’s rated strength when installed correctly. Never select clamps based solely on price, as inferior products may fail under normal working loads.
Consider the number of clamps needed. A single clamp is never sufficient for critical applications. Most standards require at least two clamps per connection, though three or more may be necessary for larger cables or higher loads. The cable diameter determines the minimum number required.
Environmental factors influence material selection. Outdoor installations need galvanized or stainless steel clamps. Marine applications demand stainless steel to withstand salt water exposure. Indoor applications with climate control can use less expensive options.
Check relevant safety standards and regulations for your specific application. OSHA, ASME, and other organizations provide guidelines for secure cable fastening in various industries. Following these standards ensures compliance and safety.
Gathering Necessary Tools and Materials
Proper installation requires the right tools. Having everything ready before starting prevents interruptions and ensures you can complete the job correctly.
You’ll need appropriate wrenches or sockets that fit your clamp nuts. Most clamps use standard hex nuts, so a socket set or adjustable wrenches will work. A torque wrench is essential for achieving proper tightness without over-tightening, which can damage the cable.
Wire cutters designed for cable cutting are necessary if you need to trim the cable after forming the loop. Standard wire cutters won’t work on anything but the smallest cables. For larger cables, you’ll need specialized cable cutters or a cutting torch.
Measuring tools help ensure proper spacing between clamps. A tape measure or ruler allows you to place clamps at the correct intervals. Marking the cable before installation helps maintain consistent positioning.
Safety equipment protects you during installation. Heavy gloves prevent cuts from cable strands. Safety glasses protect your eyes from metal fragments. If working at heights, proper fall protection equipment is mandatory.
Thimbles are optional but highly recommended components. These metal inserts fit inside cable loops, preventing the cable from bending too sharply and reducing wear at the connection point. They significantly extend the life of your cable system.
Preparing the Cable for Installation
Preparation is crucial for achieving a secure connection. Taking time to properly prepare the cable prevents problems during installation and ensures maximum holding strength.
Inspect your cable thoroughly before beginning. Look for broken strands, kinks, corrosion, or other damage. Never install clamps on damaged cable, as these weak points can fail even with perfect clamp installation. Replace any questionable cable rather than risking failure.
Uncoil the cable carefully to avoid creating kinks or twists. Kinked cable has reduced strength and won’t seat properly in the clamps. If you discover kinks, either cut that section out or replace the entire cable.
Measure and mark where you’ll form the loop and where each clamp will sit. Accurate measurements ensure proper spacing and adequate tail length beyond the last clamp. The tail should extend at least six cable diameters past the final clamp.
Clean the cable if it’s dirty or covered with protective coatings that might interfere with clamp grip. Use a wire brush or appropriate solvent. However, don’t remove protective coatings like galvanization unless they prevent proper clamp seating.
If using a thimble, insert it into the loop now. The thimble should fit snugly inside the cable loop, supporting the entire curved section. This prevents sharp bending that weakens the cable over time.
Installing the First Clamp Correctly
The first clamp’s position and orientation are critical. Mistakes here affect the entire connection’s strength and reliability.
Position the first clamp near the loop but not too close. It should sit approximately one cable diameter from the thimble or loop end. This distance allows the clamp to grip effectively without interfering with the loop’s formation.
Orientation matters significantly. The saddle portion always goes on the load-bearing or live end of the cable. The U-bolt goes on the tail or dead end. Remember the phrase “never saddle a dead horse” to maintain correct orientation. Reversing this crushes the load-bearing cable, dramatically reducing strength.
Slide the clamp onto both cable sections. The live end and dead end should both pass through the clamp, with the U-bolt around the dead end and the saddle against the live end. Ensure both cables sit fully in their respective positions.
Start the nuts by hand, threading them onto the U-bolt until they contact the saddle. Don’t use tools yet. Hand-tightening allows you to verify proper positioning before applying significant force.
Check alignment before tightening. Both cable sections should run parallel through the clamp. The clamp should sit perpendicular to the cable direction. Misalignment indicates positioning problems that you must correct before proceeding.
Proper Tightening Techniques
Tightening clamps correctly requires a specific approach. Too loose and the cable will slip. Too tight and you’ll damage the cable or clamp.
Begin tightening both nuts evenly. Alternate between nuts, turning each a little at a time. This ensures even pressure distribution across the saddle and prevents the clamp from cocking to one side. Uneven tightening can bend the U-bolt or cause the saddle to sit improperly.
Tighten until the cable begins to deform slightly. You should see a small flattening where the saddle presses against the cable. This deformation indicates adequate grip. However, excessive deformation weakens the cable, so stop when you see approximately 10 to 15 percent flattening.
Use a torque wrench for consistent results. Manufacturer specifications provide recommended torque values for each clamp size. Following these specifications ensures adequate tightness without over-tightening. If specifications aren’t available, general guidelines suggest tightening until the saddle grooves leave visible impressions on the cable.
After initial tightening, the cable will experience some settling. Plan to retighten all clamps after the first load application. This second tightening compensates for the cable compression that occurs under initial stress.
Never weld clamps or nuts to prevent loosening. Welding weakens both the clamp and cable through heat damage. Use thread-locking compound if vibration is a concern, but retightening remains the preferred method for maintaining proper tension.
Installing Additional Clamps
Multiple clamps distribute stress and prevent slippage. Proper spacing and consistent installation of all clamps ensure maximum security.
The second clamp should be positioned according to standard spacing guidelines. For most applications, clamps should be spaced approximately six cable diameters apart. This spacing prevents stress concentration while providing adequate grip length.
Install the second clamp with the same orientation as the first. All clamps must have saddles on the live end and U-bolts on the dead end. Consistent orientation is essential for proper function.
Follow the same tightening procedure for each additional clamp. Maintain even pressure between nuts and achieve similar cable deformation across all clamps. Consistency ensures even load distribution.
The final clamp should be positioned with adequate tail remaining beyond it. The tail should extend at least six cable diameters past the last clamp. This extra length accounts for any cable slippage during initial loading and provides a safety margin.
Count your clamps to verify you’ve installed the minimum required number. Small cables might need only two clamps, while larger cables may require four or more. Consult spacing charts based on cable diameter to determine the exact number needed.
Common Installation Mistakes to Avoid
Understanding common errors helps you avoid them. Many clamp failures result from preventable installation mistakes.
Reversed clamp orientation is the most frequent and dangerous mistake. Installing the U-bolt on the live end crushes the load-bearing cable, reducing strength by 50 percent or more. Always verify orientation before tightening any clamps.
Insufficient clamp numbers compromise security. Using too few clamps causes excessive stress on each one and increases slippage risk. Follow minimum clamp requirements religiously, and consider adding extra clamps for critical applications.
Improper spacing reduces effectiveness. Clamps placed too close together don’t distribute stress adequately. Clamps placed too far apart allow cable movement between them. Maintain recommended spacing throughout the connection.
Inadequate tail length is another common error. If the tail is too short, the cable can slip through the final clamp under load. Always leave at least six cable diameters beyond the last clamp.
Overtightening damages both clamps and cable. Excessive force crushes the cable excessively, reducing its strength. It can also deform or break the clamp components. Tighten just enough to achieve slight cable deformation, then stop.
Inspecting Your Installation
Thorough inspection catches problems before the system goes into service. Never skip this critical step.
Visual inspection comes first. Examine each clamp to verify correct orientation. Check that saddles rest on the live end throughout the connection. Look for any obvious misalignment or improper seating.
Measure tail length to confirm it meets minimum requirements. Use your tape measure to verify at least six cable diameters extend past the final clamp. If the tail is too short, add another clamp or remake the connection with more cable.
Check clamp spacing using your measurements. Verify that clamps are positioned approximately six cable diameters apart. Uneven spacing may indicate a clamp was missed or positioned incorrectly.
Examine cable deformation at each clamp. The saddle should leave visible impressions on the cable without crushing it excessively. Similar deformation across all clamps indicates consistent tightening.
Verify that all nuts are secure. Try each nut with your wrench to ensure it hasn’t loosened. Mark nuts with paint or marker so you can easily verify they haven’t rotated during future inspections.
Load Testing and Retightening
Initial loading causes cable compression that requires addressing. Proper testing and retightening ensure long-term reliability.
Apply a test load when possible. If your application allows, put the system under its expected working load or slightly higher. This initial loading seats everything properly and reveals any installation issues.
Monitor the connection during the first load application. Look for any unusual movement or slippage. If you observe problems, remove the load immediately and inspect the installation for errors.
Retighten all clamps after the first loading cycle. The cable will have compressed slightly under load, causing the clamps to loosen. Go through each clamp systematically, applying additional torque to restore proper tightness.
Document your installation and testing. Record the cable size, clamp specifications, number of clamps used, torque settings, and inspection dates. This documentation proves due diligence and helps track maintenance schedules.
Establish a regular inspection schedule based on your application’s demands. High-stress or critical applications may require monthly inspections. Less demanding applications might only need annual checks. Regular inspections catch wear and loosening before they cause failures.
Special Considerations for Different Applications
Various applications require specific approaches to wire rope clamp installation. Understanding these differences ensures appropriate methods for your specific situation.
Overhead applications demand extra safety measures. Use additional clamps beyond the minimum requirement. Consider redundant connections for critical overhead installations. Regular inspections become even more important when failure could cause injuries.
Marine environments accelerate corrosion. Use only stainless steel clamps and cables in saltwater applications. Inspect connections more frequently, as salt water causes hidden damage. Consider protective coatings for additional corrosion resistance.
Dynamic loads create different challenges than static loads. Applications with constant movement or vibration require closer clamp spacing and more frequent retightening. Thread-locking compound on nuts helps prevent loosening from vibration.
Temperature extremes affect both cable and clamp properties. Very cold temperatures make steel more brittle. Very hot temperatures can cause expansion and loosening. Account for your environment’s temperature range when selecting materials and establishing inspection intervals.
Temporary installations might seem less critical, but they still require proper technique. Short-term use doesn’t eliminate the need for correct orientation, adequate clamp numbers, and proper tightening. Temporary doesn’t mean unsafe.
Maintenance and Long-Term Care
Proper maintenance extends the life of your cable system and ensures ongoing safety. Establish routines that keep connections secure.
Conduct regular visual inspections according to your established schedule. Look for rust, damage, loose nuts, or frayed cable. Address any problems immediately rather than waiting for the next scheduled inspection.
Retighten clamps periodically, especially in the first few months after installation. Cable compression continues gradually over time. Quarterly retightening during the first year helps maintain proper tension.
Monitor for cable wear at clamp locations. The saddle creates a stress point where individual cable strands may begin breaking. If you notice broken strands, the entire connection may need replacement.
Keep detailed maintenance records. Document each inspection, including date, inspector name, findings, and any corrective actions taken. These records prove due diligence and help identify developing problems.
Replace clamps if you notice deformation, corrosion, or damage. Bent U-bolts, cracked saddles, or stripped threads indicate the clamp has reached the end of its service life. Don’t try to repair damaged clamps; replacement is the only safe option.
When to Seek Professional Help
Some situations require expertise beyond basic installation knowledge. Recognizing when to consult professionals ensures safety in complex applications.
Critical or life-safety applications benefit from professional installation. If cable failure could cause injuries or fatalities, hire qualified riggers or engineers to design and install the system. The cost of professional services is minimal compared to potential liability.
Large or complex systems may exceed DIY capabilities. Projects involving cables over one inch in diameter, multiple connection points, or unusual loading conditions require specialized knowledge. Professionals have the experience to handle these challenges correctly.
Regulatory compliance often demands certified installers. Many jurisdictions require licensed professionals for certain types of installations. Check local regulations before starting your project to ensure compliance.
If you’re uncertain about any aspect of the installation, consult an expert. It’s better to ask questions and get proper guidance than to make mistakes that compromise safety. Many rigging supply companies offer technical support and can answer installation questions.
Engineering calculations may be necessary for custom applications. If standard guidelines don’t clearly apply to your situation, a professional engineer can perform the calculations needed to ensure adequate safety factors.
Conclusion
Installing rope clamps with screws requires attention to detail and adherence to proven techniques. Proper secure cable fastening starts with selecting appropriate clamps for your specific application and continues through careful installation, tightening, and inspection. Following the methods outlined in this guide ensures your connections remain secure under stress.
Remember that correct orientation is paramount. Saddles always go on the live end while U-bolts go on the dead end. Use the minimum required number of clamps for your cable size, space them properly, and tighten them to achieve slight cable deformation without crushing. Additionally, always leave adequate tail length beyond the final clamp.
Initial retightening after the first load application compensates for cable compression and ensures long-term security. Regular inspections catch problems before they become dangerous, making maintenance an essential part of any cable system. Therefore, establish and follow an inspection schedule appropriate to your application’s demands.
Whether you’re working on a home project or professional installation, these principles of wire rope clamp installation apply universally. Taking time to do the job correctly provides peace of mind and ensures safety for everyone who depends on your cable connections. The small investment in proper installation techniques pays enormous dividends in reliability and longevity.
Frequently Asked Questions
How many rope clamps do I need for my cable diameter?
The number of clamps required depends on the cable diameter. Generally, cables up to half an inch need two clamps minimum. Cables from half an inch to three-quarters inch require three clamps. Cables larger than three-quarters inch need at least four clamps. However, always consult manufacturer specifications or industry standards for your specific application, as critical installations may require additional clamps beyond these minimums.
Can I reuse rope clamps after removing them?
Reusing rope clamps is not recommended for critical applications. The tightening process deforms both the clamp and cable slightly, and repeated use can weaken the clamp’s grip. Additionally, threads may become damaged during removal. For non-critical, temporary installations, careful inspection of clamps for damage, deformation, or thread wear is essential before reuse. When in doubt, use new clamps to ensure maximum safety and reliability.
What’s the difference between a rope clamp and a cable clamp?
The terms are often used interchangeably, though technically they refer to the same device. Both secure wire rope or cable by creating mechanical grip through a U-bolt and saddle arrangement. Some manufacturers use “rope clamp” while others prefer “cable clamp” or “wire rope clip.” Regardless of terminology, proper selection based on cable diameter and application requirements remains essential for safe installation.
How tight should I make the clamp nuts?
Tighten clamp nuts until you see slight flattening of the cable beneath the saddle, typically about 10 to 15 percent cable deformation. Use manufacturer-specified torque values when available. For standard galvanized clamps, torque typically ranges from 15 to 65 foot-pounds depending on clamp size. Over-tightening crushes the cable and reduces strength, while under-tightening allows slippage. Always retighten after initial loading to compensate for cable compression.
Why does the saddle have to go on the live end of the cable?
The saddle must go on the live end because it distributes pressure evenly across the cable’s surface, preserving its strength. The U-bolt, conversely, creates concentrated pressure that can crush and weaken cable strands. Installing the U-bolt on the live end reduces the cable’s strength by 50 percent or more because the load-bearing portion gets crushed. Proper orientation maintains maximum cable strength through the connection.
Related Topics:
What Are the Potential Applications of Smart Ropes in Robotics and Automation?
Rope-Like Strong String: Best Options for Heavy-Duty Projects