Achieving the optimal bike seat position is an essential aspect that must not be overlooked in cycling, as it can significantly impact your comfort, efficiency, and injury prevention. To put it into perspective, the position of your seat affects several factors, such as your pedaling power, aerodynamics, weight distribution, and handling, which ultimately determine your overall cycling experience. Therefore, setting up your bike to fit your body and riding style is crucial, which may require some trial and error to get it just right. However, by following some essential tips, you can dial in a position that will work for you for the long haul, allowing you to enjoy a comfortable and injury-free ride.
What Factors Affect Bike Seat Position?
Several elements go into determining your ideal seat position:
Saddle Height
Your seat’s up-and-down position affects your leg extension and pedaling power. Proper saddle height is a balance between allowing for efficient pedaling and avoiding overstretching your legs.
Saddle Fore/Aft
This is the forward and backward position of the seat on the rails. It impacts your reach to the handlebars and weight distribution over the pedals.
Saddle Angle
The tilt of the saddle, either angled up or down, affects comfort and weight distribution. A slight downward tilt is standard.
Handlebar Height
The handlebar position affects your back angle and arm reach. For road bikes, bars are commonly lower than the saddle.
Body Flexibility
Your natural flexibility impacts your ability to bend and reach comfortably. For female riders seeking the most comfortable bike seat for women, less flexible individuals may find that they need a more upright position to ensure a pleasant riding experience.
Start With Saddle Height
Your saddle height is the first place to start, which can drastically affect pedaling and comfort. Here are some tips on setting saddle height:
- Stand over Height: There should be 1-3 inches (2.5-7.5cm) of clearance between your crotch and the top tube when standing over the bike. This allows you to stand over the bike comfortably.
- Leg Extension: With your heel on the pedal, your leg should be almost fully extended at the bottom of the pedal stroke. Your hips should not rock side to side. A slight bend in the knee is normal.
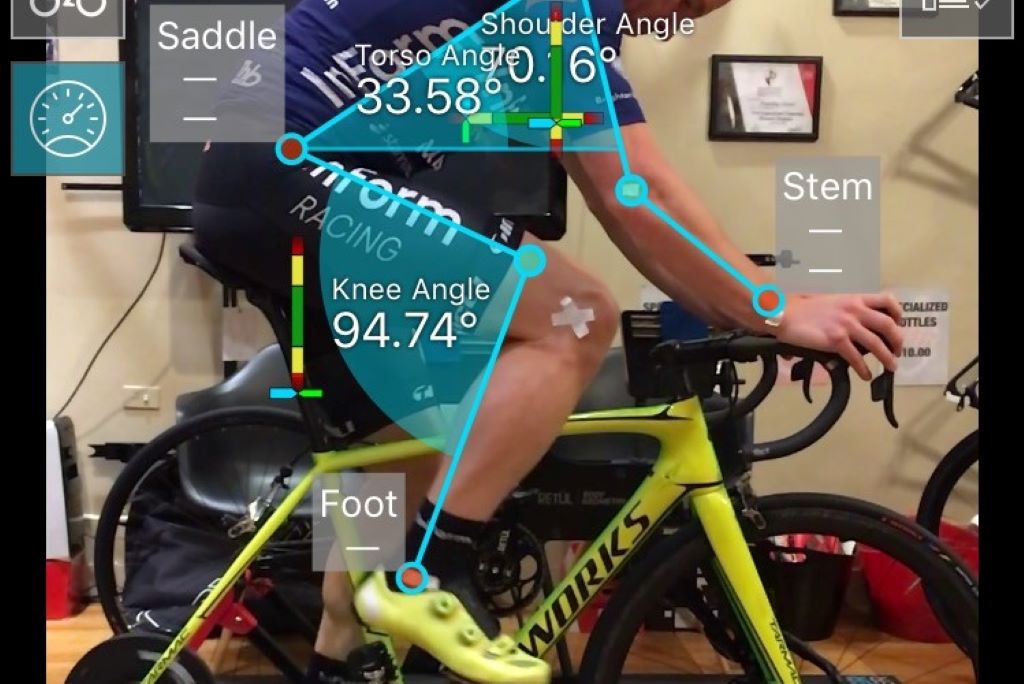
- Knee Pain: If your saddle is too low, you may feel pain behind your kneecap. If it’s too high, you may feel pain in front of the kneecap. Adjust until it feels comfortable.
- Pedaling Efficiency Test: Pedal with your toes only to isolate your quads. If your hips rock side to side, the height needs adjusting.
- Heel Method: Lower your saddle until you can rest your heel on the pedal with your leg straight. This should approximate your ideal saddle height.
Make small increments of 5mm when adjusting saddle height until you find the ideal position. Reassess frequently as flexibility changes.
Dial In Saddle Fore/Aft Position
Once you have your saddle height set, adjusting the fore/aft position can enhance power and comfort:
- Move the seat forward to increase thigh extension and rearward force on the pedals. This adds power but can reduce comfort.
- Move the seat rearward to open up your hip angle for more comfort, but potentially reduce pedaling power.
- Knee pain over the front of the kneecap often means the seat is too far forward. Move it rearward in small increments until the pain subsides.
- As a starting point, your knee should be aligned with the pedal spindle when the crank arms are parallel to the seat tube.
Test different fore/aft positions over short rides to find the right balance of power and comfort.
Dial In Saddle Angle
Most saddles have a slight downward tilt in the 3-5 degrees range. Here are tips on setting the saddle angle:
- You are tiling the saddle downward, shifting your weight slightly forward, putting less pressure on your hands and arms.
- Excess downward tilt can cause you to feel like you will slide forward off the saddle. Find the sweet spot.
- Tilting the saddle upward puts more pressure on your hands and arms as more weight rests on your sit bones.
- Try different angles during short rides to assess comfort.
- Use a trim-level tool on the saddle to set and measure the angle.
Don’t go overboard on saddle tilt. Usually, only minor adjustments are needed.
Handlebar Positioning

Handlebar height and reach impact your back, neck, arm, and hand comfort. Follow these tips for dialing in your handlebars:
- Start with the handlebar positioned level with or slightly below your saddle height.
- Handlebars below the saddle make you lean forward more aggressively, putting pressure on your hands and arms.
- Raising the handlebar height reduces reach and creates a more upright, relaxed position. It is better for less flexible riders.
- Adjusting handlebar reach via stem length also changes your upper body angle. Longer reduces reach.
- Wider handlebars provide more arm and hand positions. It’s better for long rides.
- Listen to neck, arm, hand, and back feedback. Adjust until comfortable.
Don’t be afraid to avoid the classic pro racer dropped handlebar position if needed. Choose comfort.
Saddle Variations
Not all saddles fit every rider. Finding the right saddle improves comfort and optimizes your position. Consider these factors:
- Saddle width should fit your sit bone width to distribute weight properly. Get sized if unsure.
- More comprehensive, cushioned saddles favor upright positions, while narrow, firm saddles suit aggressive positions.
- Cutout saddles remove pressure on soft tissues and may suit some riders better.
- The saddle shape should match your flexibility and how upright you ride. Test different options.
- Women-specific saddles are broader and shorter to accommodate hip position differences.
Don’t give up if the stock saddle feels uncomfortable. Finding the right saddle for your physiology can change everything.
Flexibility Limitations
Every rider has a different natural flexibility based on age, gender, genetics, injuries, fitness, and more. Consider your unique mobility:
- Stretching helps safely increase the range of motion over time for a lower position.
- If inflexible, start with a higher handlebar and more upright saddle position.
- Raising handlebars and moving the saddle rearward can reduce strain on the back, neck, arms, and hands.
- Yoga, off-the-bike stretching, core work, and using a foam roller can boost flexibility.
- Consult a bike fitter if pain or discomfort persists at any position.
Please don’t push your flexibility past its healthy limits or overdo an aggressive position. Take time to allow your body to adapt safely.
Make Iterative Changes
Dialing in your position is a process of making gradual tweaks and noticing the effects:
- Only change one element, like saddle height or handlebar reach.
- Test each adjustment over multiple short rides before further tweaks.
- Keep detailed notes on the positions tried and their effects.
- Listen for feedback from muscles, joints, pressure points, and experience.
- Periodically reassess your position as flexibility evolves.
Finding your ideal position takes time. Making incremental changes allows your body to adapt at its own pace.
Consider Professional Bike Fitting
If you have persistent pain or discomfort on the bike that doesn’t resolve with self-fitting, consider seeing a professional bike fitter. They can:
- Use body measurements and proportions to determine the ideal frame size.
- Analyze your posture, flexibility, and medical conditions impacting positioning.
- Make micro-adjustments to your contact points, like saddle height and handlebars.
- Prescribe exercises to improve areas lacking flexibility or strength.
- Recommend alternate componentry like handlebar shapes if needed.
Seeking outside expertise can fast-track the search for a pain-free and efficient position. This is wise for anyone spending serious time cycling.
Getting your perfect bike seat position dialed in takes self-experimentation, patience, and gradually honing in on the sweet spot. Stay tuned into your body, take detailed notes, and don’t rush the process. With some time and miles spent in the saddle, you’ll pedal off happily into the sunset!
Frequently Asked Questions
Q: How do I know if my saddle is too high or too low?
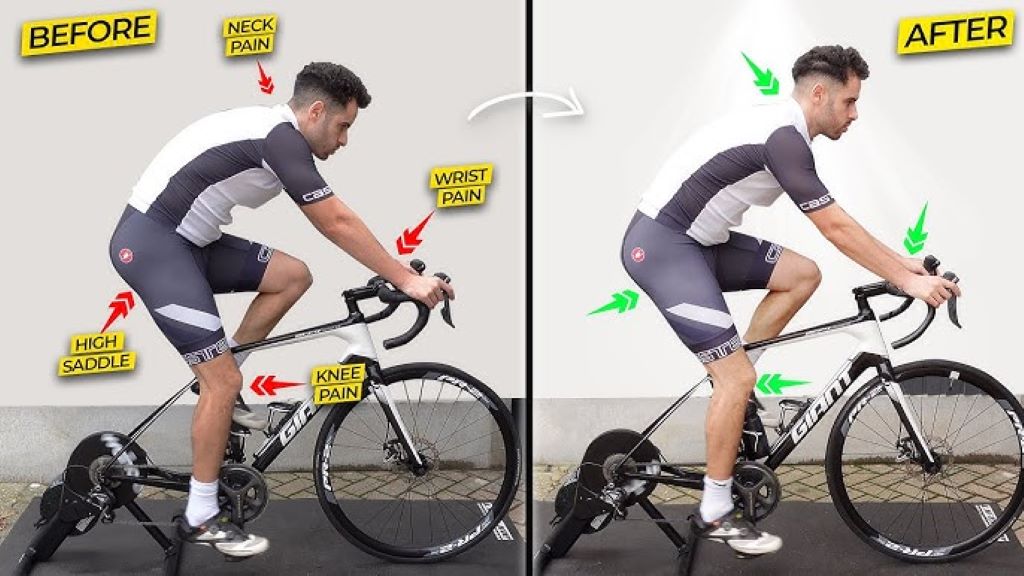
If your saddle is too low, you may feel excessive knee strain while pedaling or difficulty engaging your glutes and hamstrings. Your hips may rock from side to side. If it’s too high, you may feel tension in your hips, low back pain from overextending your legs, or pain behind the kneecap. Adjust in small increments until you find the height where pedaling feels natural, and your knees are comfortable.
Q: Should my saddle be level or tilted slightly down?
A: Most saddles have a slight downward tilt of 3-5 degrees. This shifts your weight slightly forward for more comfort and better power transfer. Excess tilt can cause the feeling of sliding forward, however. Use a trim level on the saddle to set and measure the angle as you find the sweet spot.
Q: How far behind the bottom bracket should my seat be?
A: As a starting point, your knee should be aligned with the pedal spindle when the crank arms are parallel to the seat tube. This allows for an efficient pedal stroke. You can then make minor adjustments forward or rearward to fine-tune your position. Moving the seat ahead increases power but reduces the comfort while moving it rearward does the opposite.
Q: My lower back hurts when riding – how can I adjust my position?
A: Lower back pain on the bike often indicates your upper body is flexed too far forward, putting strain on the spine. Try raising your handlebars incrementally to reduce the reach and create a more upright position. You can also tilt the seat slightly upward to help take pressure off the lower back. Strengthening your core helps support the back as well. If the pain persists, a professional bike fit may be needed.
Q: I have wrist, hand, or neck pain when riding. What adjustments will help?
A: Wrist, hand, and neck pain typically results from too much weight on your upper body when leaning forward. Try raising the handlebars so you don’t have to reach as far. Ensure your saddle isn’t tilted upward, forcing weight onto the hands. You can also try a shorter stem to reduce reach. Handlebar grips with more cushioning or double-wrapped tape can ease pressure on hands. Stretching the neck regularly helps, too.
Q: What is the best way to find my optimum handlebar height?
A: Start with your handlebars positioned level with or slightly below your saddle height. This is a moderate position for most riding styles. To reduce strain on your back, neck, and hands, raise the bars incrementally until you find a relaxed height for your flexibility. The optimum bar height allows you to maintain a neutral back angle and slightly bent elbows without overreaching. Listen to feedback from your body, and don’t be afraid to steer away from an aggressive low position if needed.
In Summary
Finding your ideal bike seat position requires getting the saddle height, fore/aft, tilt, and handlebar position dialed in based on your body, flexibility, and riding style. Road bikes are expensive due to their advanced materials and technology, but it’s a worthy investment. Make gradual tweaks, listen to feedback from your body, and give your body time to adapt as you hone in on the optimum position. Invest in a professional bike fitting to analyze your position in detail. With patience and self-experimentation, you can pedal in comfort and efficiency.