Ahoy, DIY water wranglers! So, your shower handle has decided to add a little extra water feature to your bathroom – not the kind you were hoping for, right? No worries, we’re diving into the sea of plumbing mysteries to figure out how to stop that sneaky leak. Get your toolkit ready, and let’s plug this leaky ship!
The Drip Dilemma: A Symphony You Didn’t Sign Up For
Drip, drip, drip – it’s like your shower is composing a water symphony. But let’s not turn your bathroom into a waterpark. First things first, turn off the water supply to the shower. It’s like hitting the pause button on the watery orchestra.
Behind the Scenes: Understanding the Shower Handle Setup
Now, let’s get behind the curtain and understand the shower handle setup. Most handles have a valve that controls the water flow, and if there’s a leak, it’s likely coming from the connections inside. It’s like solving a mystery – we’re on the lookout for the culprit.
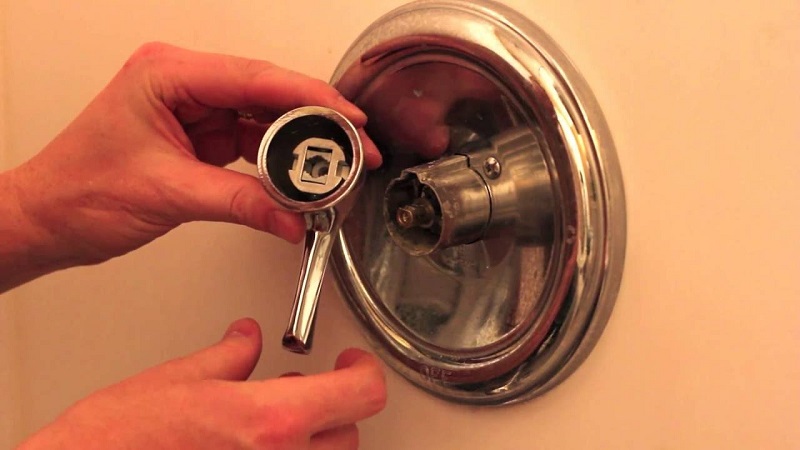
Step 1: Remove the Handle – Unmasking the Villain
Grab your screwdriver – we’re about to unmask the leaky villain. Remove the handle to reveal the inner workings. It’s like peeling back the layers to see what’s causing the mischief. There might be screws or decorative caps hiding the way, but they’re no match for your DIY prowess.
Step 2: Check the Valve and Cartridge – The Dynamic Duo
Meet the dynamic duo – the valve and cartridge. They control the water flow and temperature. If there’s a leak, it might be due to a worn-out cartridge or a faulty valve. It’s like Batman and Robin – they work together, but if one goes rogue, chaos ensues.
Solution 1: Replace the Cartridge – The Hero’s Makeover
If the cartridge looks worn or damaged, it’s time for a hero’s makeover. Remove the old cartridge and replace it with a shiny new one. It’s like giving your shower handle a superhero upgrade. Make sure the replacement cartridge matches the make and model of your shower – it’s like finding the perfect sidekick.
Solution 2: Tighten Loose Connections – The Team Bonding Exercise
Leaks can sometimes sneak in through loose connections. Tighten any screws or nuts that might be playing the part of the traitor. It’s like a team-building exercise for your shower handle – everyone needs to pull their weight.
Step 3: Inspect the O-Rings – The Unsung Heroes
O-rings are like the unsung heroes of the plumbing world. They create a watertight seal, but over time, they can wear out. Inspect them for cracks or damage. If they’re looking worse for wear, replace them. It’s like giving your plumbing team a pep talk – the O-rings need to be in top form for a leak-free performance.
Solution 3: Lubricate the O-Rings – The Smooth Operators
If the O-rings are still in good shape but seem a bit stiff, a little lubrication can go a long way. Apply some plumber’s grease to keep them flexible and happy. It’s like giving your shower handle a spa day – those O-rings deserve a little pampering.
Step 4: Reassemble and Test – The Grand Finale
With the repairs done, it’s time for the grand finale. Reassemble the handle, turn the water supply back on, and give it a test run. It’s like the curtain rising on a Broadway show – let’s see if our plumbing performance steals the spotlight.
Prevention is Key: A Shower Handle Wellness Plan
Now that your shower handle is leak-free and back in action, let’s talk prevention. Regular check-ups are like a wellness plan for your plumbing. Keep an eye out for any signs of wear, tighten loose screws, and show those O-rings some love. It’s like maintaining a healthy lifestyle – a little effort goes a long way.
FAQs – Troubleshooting the Watery Woes
Q1: Why is my shower handle leaking?
A leaking shower handle is often caused by a worn-out cartridge, damaged O-rings, or loose connections. Over time, these components can wear out, leading to leaks. It’s like the plumbing version of wear and tear.
Q2: How do I know if the cartridge is the issue?
If your shower handle is leaking, and you’ve checked for loose connections, the cartridge might be the culprit. If it looks worn or damaged, it’s a good idea to replace it. It’s like swapping out a tired actor for a fresh face in a movie.
Q3: Can I use any cartridge for my shower handle?
No, not all cartridges are created equal. Make sure to use a replacement cartridge that matches the make and model of your shower handle. It’s like getting the right puzzle piece for a perfect fit.
Q4: What if I can’t find the source of the leak after checking the cartridge and O-rings?
If the leak persists after replacing the cartridge and checking the O-rings, it might be time to call in a professional plumber. Some issues might require expert eyes and hands to fix. It’s like bringing in the cavalry when the going gets tough.
Q5: How often should I check my shower handle for leaks?
Regular check-ups are a good practice. Keep an eye out for any signs of leaks or wear, and address issues promptly. It’s like going to the doctor for a yearly check-up – prevention is key to a healthy plumbing system.